
Configure an Export Definition - HTTP API
The use of a HTTP API Connector allows you to extract Members from the Loyalty platform, and transmit them to an API endpoint.
This article assumes that you have already created the Export Definition, either by creating it from scratch, or by copying an existing Export Definition.
To configure an Export Definition:
-
Select Admin from the top navigation bar, then select Integrations > Exports from the side navigation menu. The Exports screen is displayed.
-
On the Exports screen, search for the desired Export Definition (see
-
Click the name of the desired Export Definition. The Export Definition Details screen is displayed.
The Export Definition Details screen is split into multiple steps, identified by a series of numbered items across the top of the screen. You can complete these steps (described below) in any order you like. The Next button at the bottom of the screen navigates to the next step in the sequence, and the Back button navigates to the previous step.
Step 1: Filter
For HTTP API Export Definitions, an export filter is controlled by an analytics Query that defines what records to export.
-
At the top of the Export Definition Details screen, click Filter.
-
From the Bigdata Query drop-down menu, select the desired query.
-
Click Save. Or click Next to move to the next step in the Export Definition screen.
Step 2: Destination
The Destination step is used to define the destination of the export file. This step requires that you have an HTTP API Template defined.
-
At the top of the Export Definition Details screen, click Destination.
-
From the HTTP Operation drop-down menu, select the desired HTTP API Template.
-
Click Save. Or click Next to move to the next step in the Export Definition screen.
Step 3: Schedule
Export Definitions can be executed on-demand (see
In addition, you can create a schedule that executes the export once at a specified date / time, or on a recurring basis. These schedule options are described below.
Execute Only Once
To schedule an Export Definition to execute once at a specified date / time:
-
At the top of the Export Definition Details screen, click Schedule.
-
Toggle Enabled to Yes.
-
From the Recurrence drop-down menu, select Once.
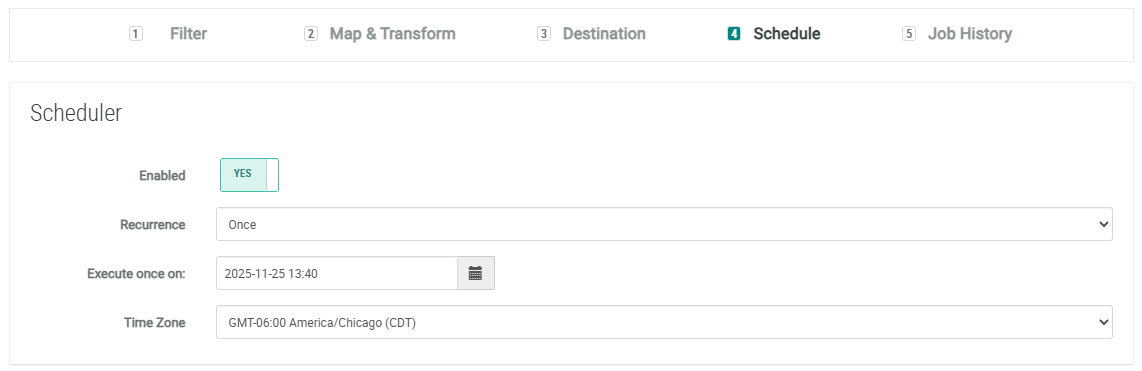
-
Click into the Execute Once On field. A calendar pop-up window is displayed. Select the desired date when you want the export to execute.
-
Within the calendar pop-up window, click the clock icon. Define the time when you want the export to execute.
-
From the Time Zone menu, select the time zone to use when determining the time to execute.
-
Click Save.
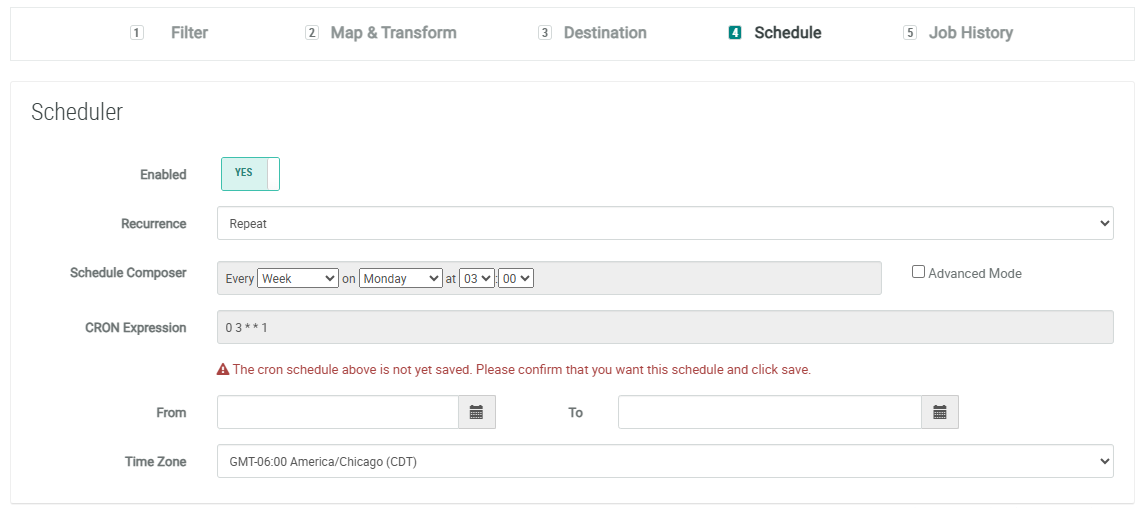
Executing on a Recurring Schedule
To schedule an Export Definition to execute on a recurring frequency:
-
At the top of the Export Definition Details screen, click Schedule.
-
Toggle Enabled to Yes.
-
From the Recurrence drop-down menu, select Repeat.
-
Next to Schedule Composer, select an interval:
-
15 Minutes
-
30 Minutes
-
Hour: Select the minute past the hour.
-
Day: Select the time of day.
-
Week: Select the day of the week, and the time of day.
-
Month: Select the day of the month, and the time of day.
-
Year: Select the day, the month, and the time of day.
-
-
As you configure the interval above, the CRON Expression field is automatically populated with the associated CRON expression. Optionally, to manually edit this expression, check Advanced Mode.
-
Optionally, using the From and To fields, define the export schedule begin and end date. If you leave these date fields blank, the schedule will run indefinitely.
-
From the Time Zone menu, select the time zone to use when determining the time to execute.
-
Click Save.
Email Notifications
You can configure the Export Definition to trigger success and / or failure notifications to one or more email recipients.
-
Optionally, if you want to send error notifications, toggle Error to Yes, then enter the email addresses for the notification recipients.
-
Optionally, if you want to send success notifications, toggle Success to Yes, then enter the email addresses for the notification recipients.
-
Click Save.

